Supabase Automatic Setup Guide
Overview
This guide will walk you through the automatic setup of Supabase as the database for your project. Supabase provides a fully managed Postgres database with authentication, storage, and other useful features. By following this guide, you will be able to:
- Create a Supabase account and project
- Retrieve API keys and set up environment variables
- Automatically initialize tables, functions, and policies
- Start your application with a fully functional backend
For the manual setup guide, refer to the Manual Setup Guide.
Database Setup
A database is required to manage customers, collect emails, authenticate users, and more. Supabase, an open-source database provider, offers a robust Postgres solution with built-in authentication and APIs. It is cost-effective (starting with a free plan) and scalable for production.
Steps to Set Up Supabase Automatically
1. Create an Account
Sign up for a free account on Supabase (opens in a new tab).
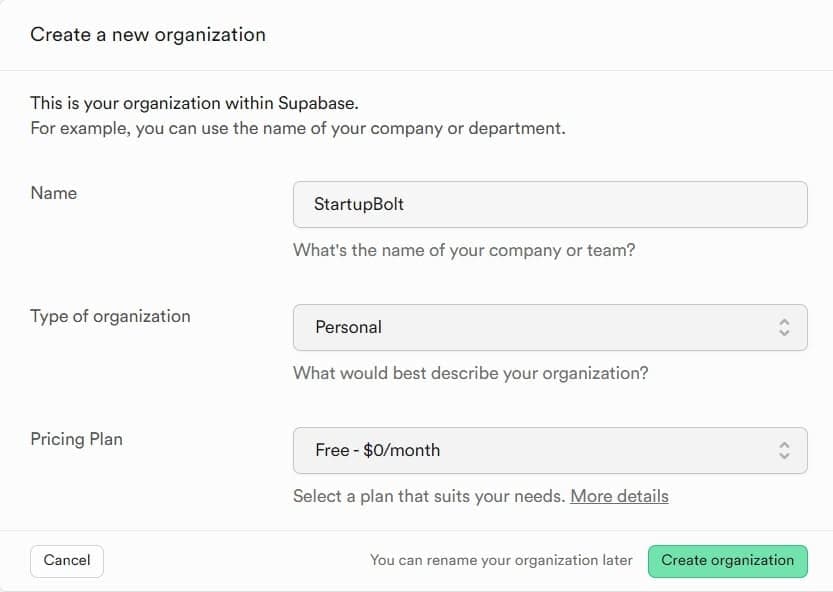
2. Create a New Organization
3. Create a New Project
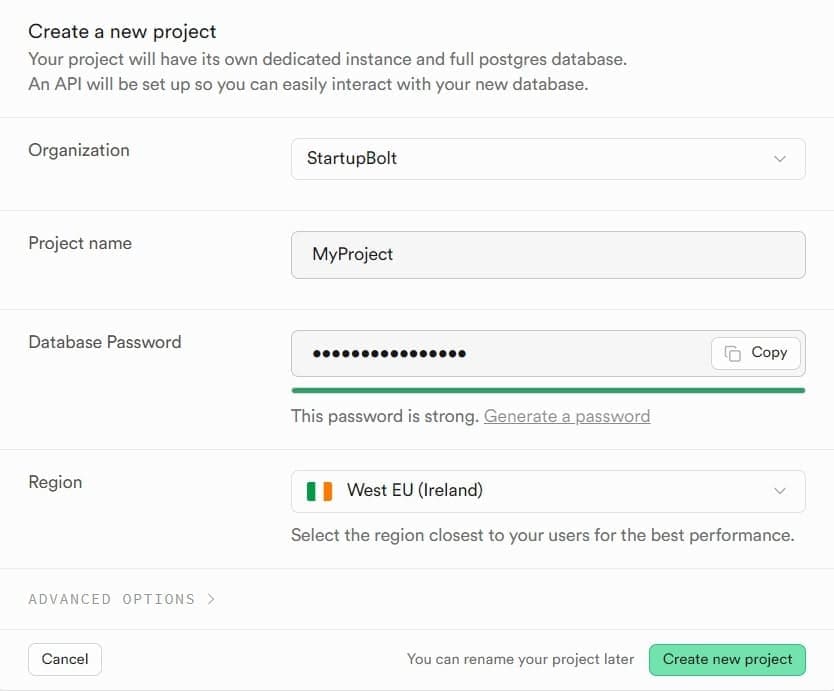
- Choose a project name and set a database password.
- Select a region close to your target audience (e.g., Ireland for better connectivity to both America and Europe).
- Leave other settings as default and create the project.
4. Retrieve your project API Keys
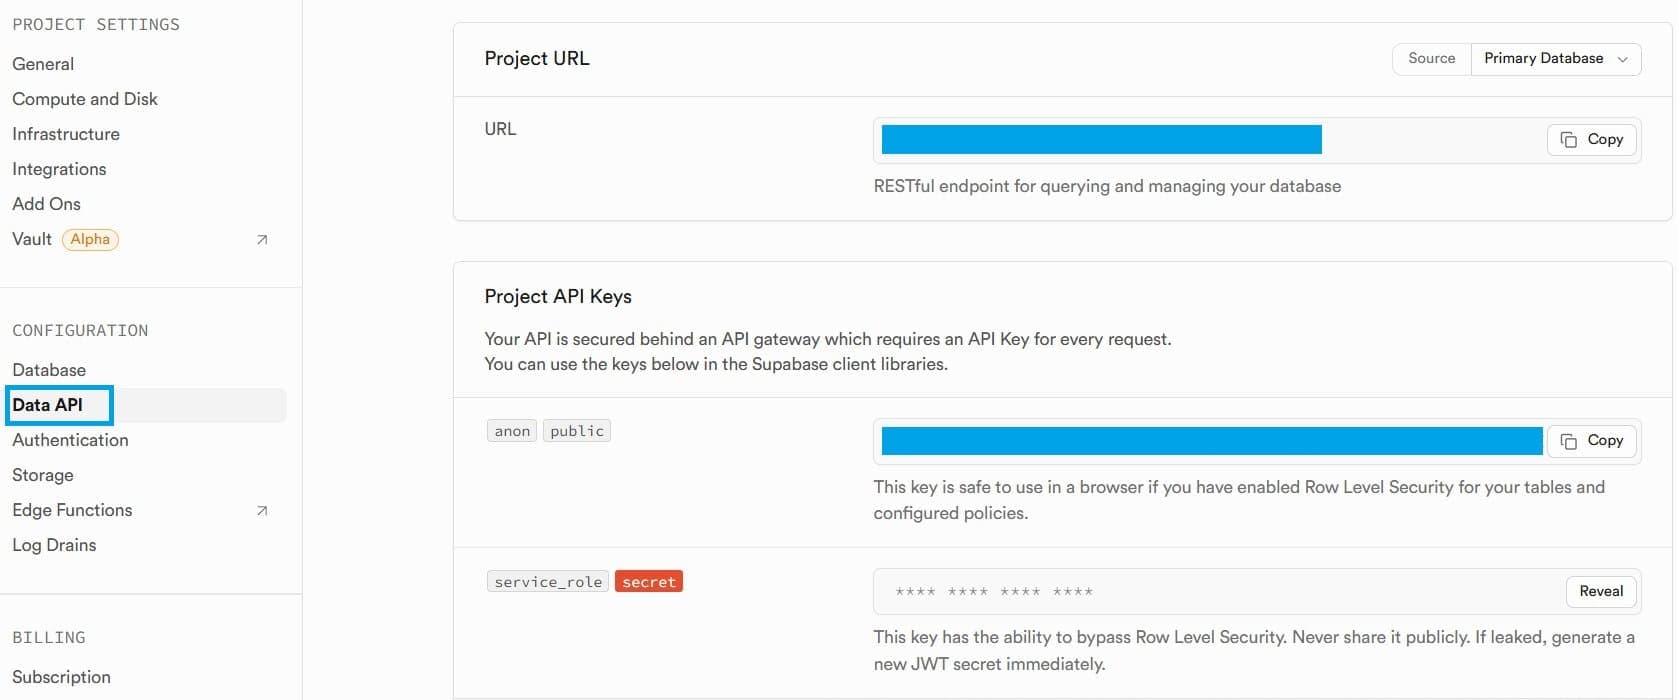
- After creating the project, you will receive API keys.
- If not, go to Project Settings > Configuration > Data API.
- Note down the Project URL, anon public API key, and service role secret API key.
5. Set Up Environment Variables

- Navigate to your project's root folder and locate
.env.local. If it doesn’t exist, rename.env.exampleto.env.local. - Add the following variables:
NEXT_PUBLIC_SUPABASE_URL=your-project-url
NEXT_PUBLIC_SUPABASE_ANON_KEY=your-anon-public-api-key
SUPABASE_SERVICE_ROLE_KEY=your-service-role-secret-api-key
If you're working in a live server, you might configure these keys differently, such as within the server's environment variable settings.
Note: Ensure the
.env.localfile is included in your.gitignoreto keep it from being pushed to GitHub. Keep all these keys safe by storing them inside the environment file only and never sharing them with anyone.
6. Configure Database Connection
The next API key you need to set is SUPABASE_POSTGRES_URL. This key is used exclusively to connect to the database for automatically setting up all tables, functions, triggers, and policies for you.
-
If you prefer to manually create these elements, you can skip this step and follow the Manual Setup Guide.
-
This guide focuses on automating the setup so you can launch your project in minutes.
-
You are encouraged to review the manual setup later to understand what happens under the hood.
-
Now, Retrieve the database connection string by clicking Connect in the top bar.

-
Choose a connection string from the available options:
- Direct connection string
- Transaction pooler string
- Session pooler string

-
Any of the above strings will work, but if your ISP uses IPv4, the session pooler string will work while the direct connection string might not. Your best option is to use either the transaction pooler string or the session pooler string for optimal stability. For this example, we will use the transaction pooler string.
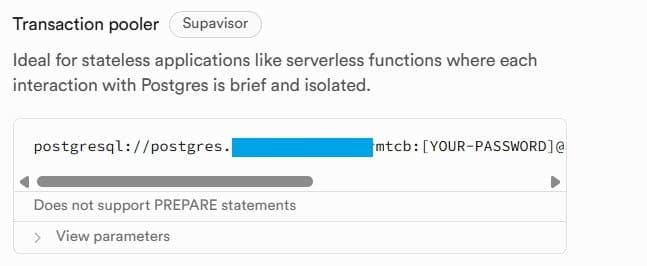
- Replace
[YOUR-PASSWORD]with your Supabase database password. - Add the following to
.env.local:
SUPABASE_POSTGRES_URL=your-connection-string7. Automatically Initialize Database Tables & Functions
Open your terminal (or PowerShell on Windows) and navigate to your project's root directory. Then, run the following command to automatically set up tables, functions, triggers, and policies:
node scripts/db-init.js --email your@email.com⚠️ Make sure to replace your@email.com with your actual email address. This email is mandatory, as it will be used to create an admin user in the database.
This script will execute SQL files to set up the necessary database structure.
Upon successful execution, you should see:
All SQL files executed successfully!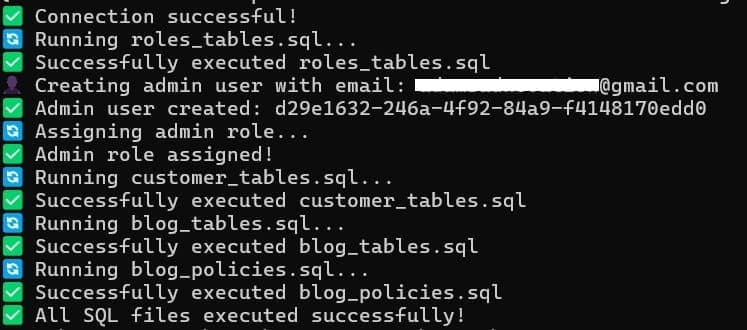
That's it! Your Supabase setup is complete! 😄
8. Start Your Application
To run your project locally, execute:
npm run devYour website is now ready to be viewed locally. Open your browser and navigate to http://localhost:3000 (or the port your website is running on if it's different).
You can log in using the email provided during the command execution above to access the admin console.
Next Steps
Proceed to the Essential Configuration guide to learn how to configure the rest of your StartupBolt website.
Final Remarks
You have successfully set up Supabase automatically for your project! 🎉
- Your database, authentication, and backend services are now ready.
- For security, ensure your
.env.localfile is included in.gitignore. - If you want to manually manage your database setup, refer to the Manual Setup Guide.
Happy building! 🚀