Google Analytics
Google Analytics allows you to track and analyze data about your website's viewers, providing insights into user behavior and website performance. We'll use GTM to set up Google Analytics (GA) in your StartupBolt project.
Note: If you prefer using other analytics tools, learning the setup for GA and GTM will provide you with the necessary foundation. If you need further assistance, feel free to email me at startupbolt@gmail.com or reach out on Twitter at https://x.com/nifal_adam (opens in a new tab). I’ll be happy to help or provide additional instructions.
Steps to Set Up Google Analytics (GA)
-
Create a Google Analytics Account
- Go to Google Analytics (opens in a new tab), log in with your Google account, and navigate to the "Admin" section.
- Create a new account and property. If you already have an account, you can create a new property under it.
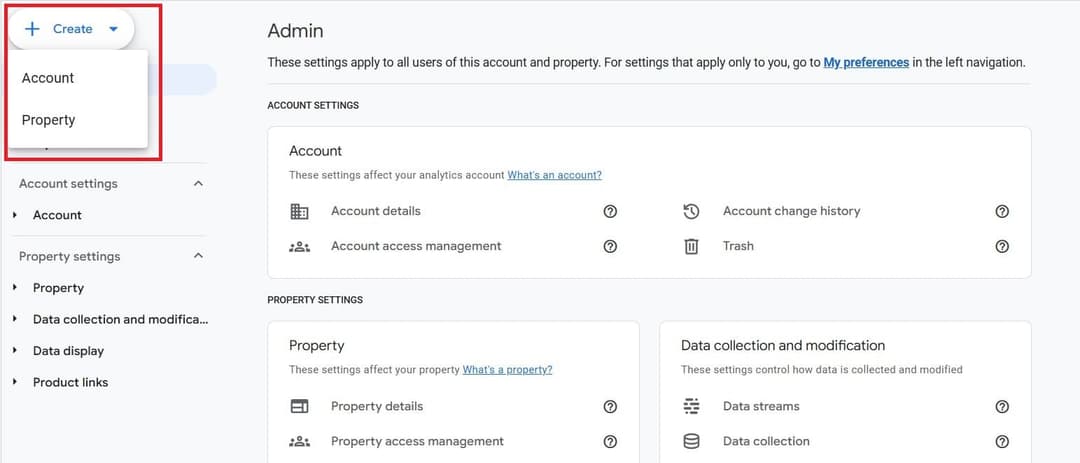
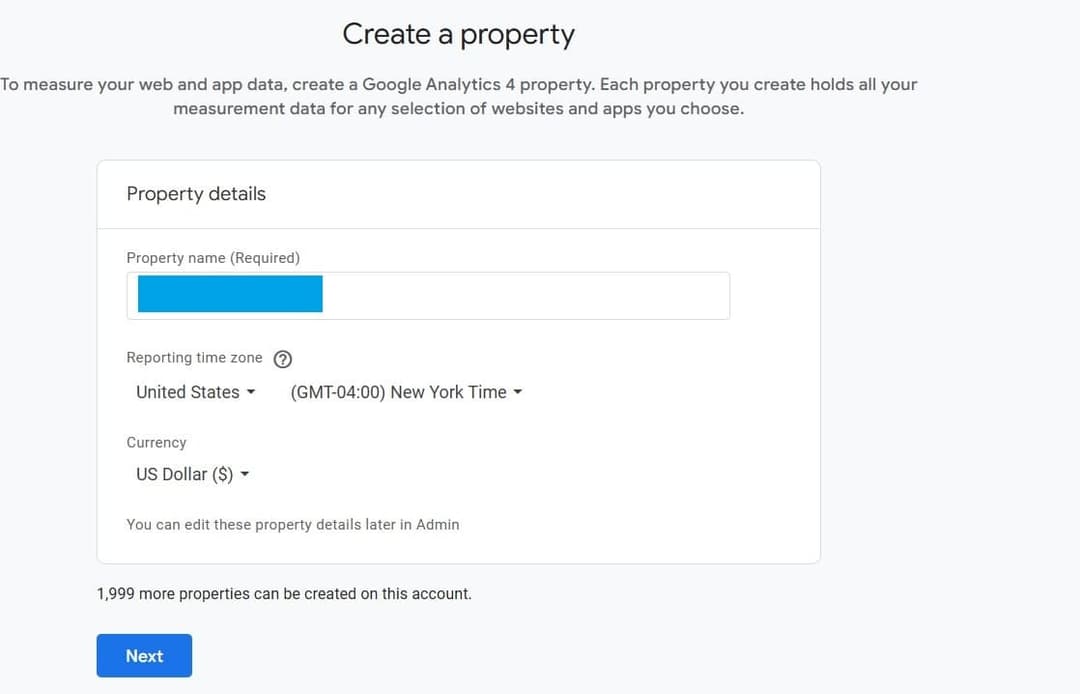
- Follow the steps required to complete the account and property setup.
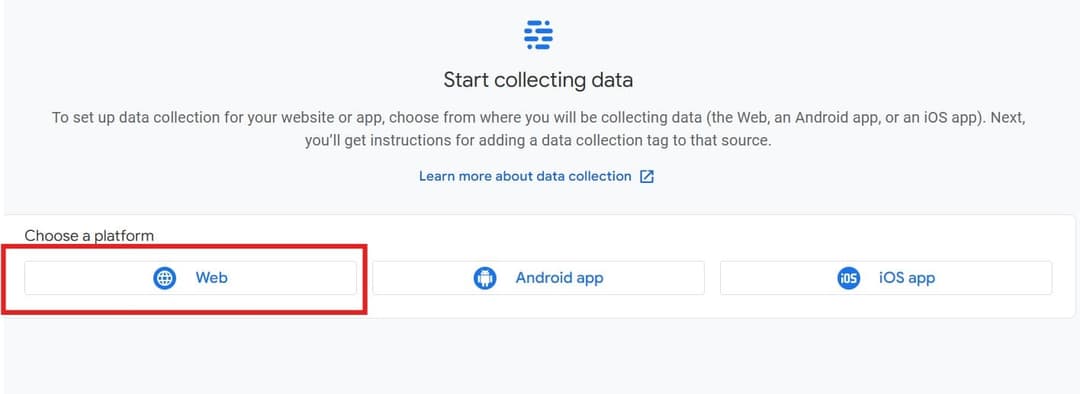
- When prompted, choose "Web" as the platform. If you missed this step, you can navigate to Admin > Property Settings > Data Collection and Modification > Data Streams to access it.
- Set up your web stream by entering your website URL and naming the stream.
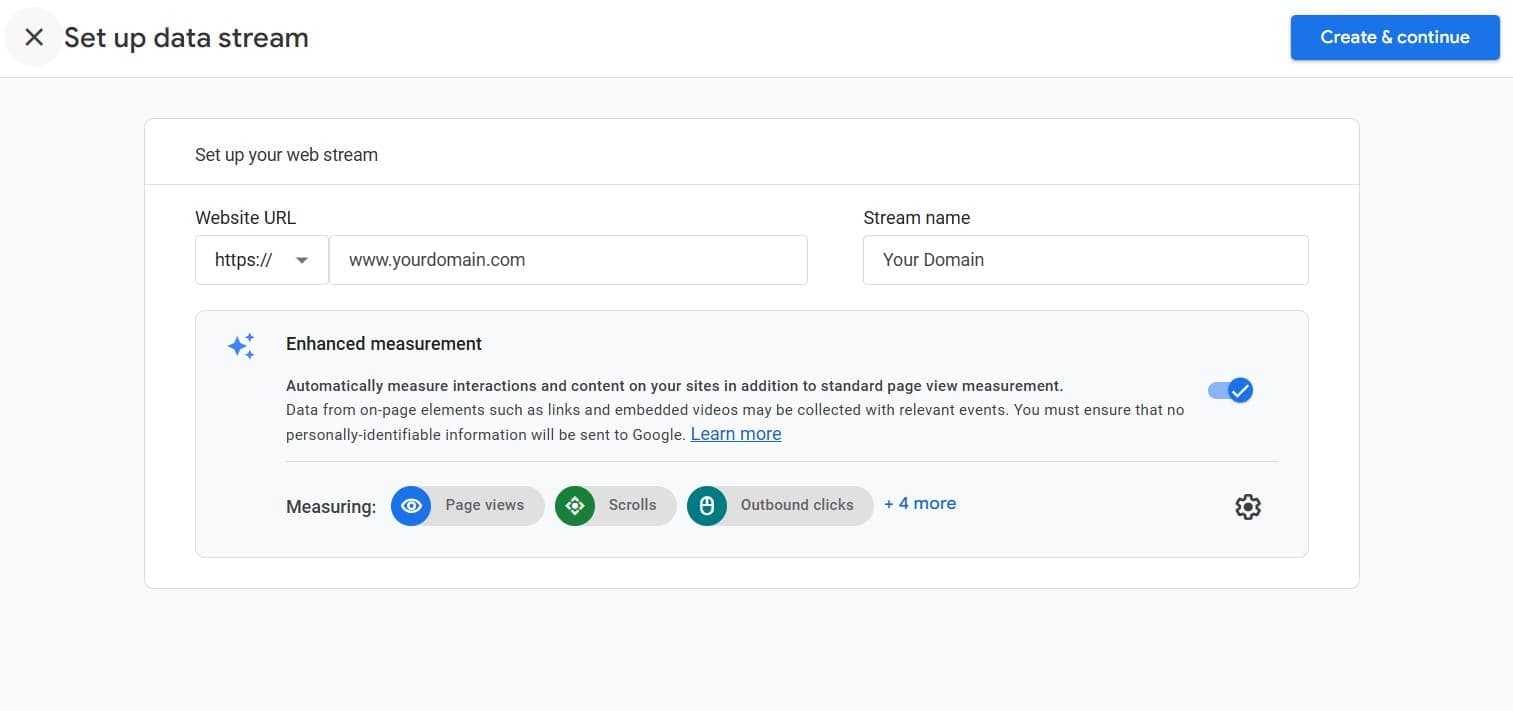
- Click "Create & continue."
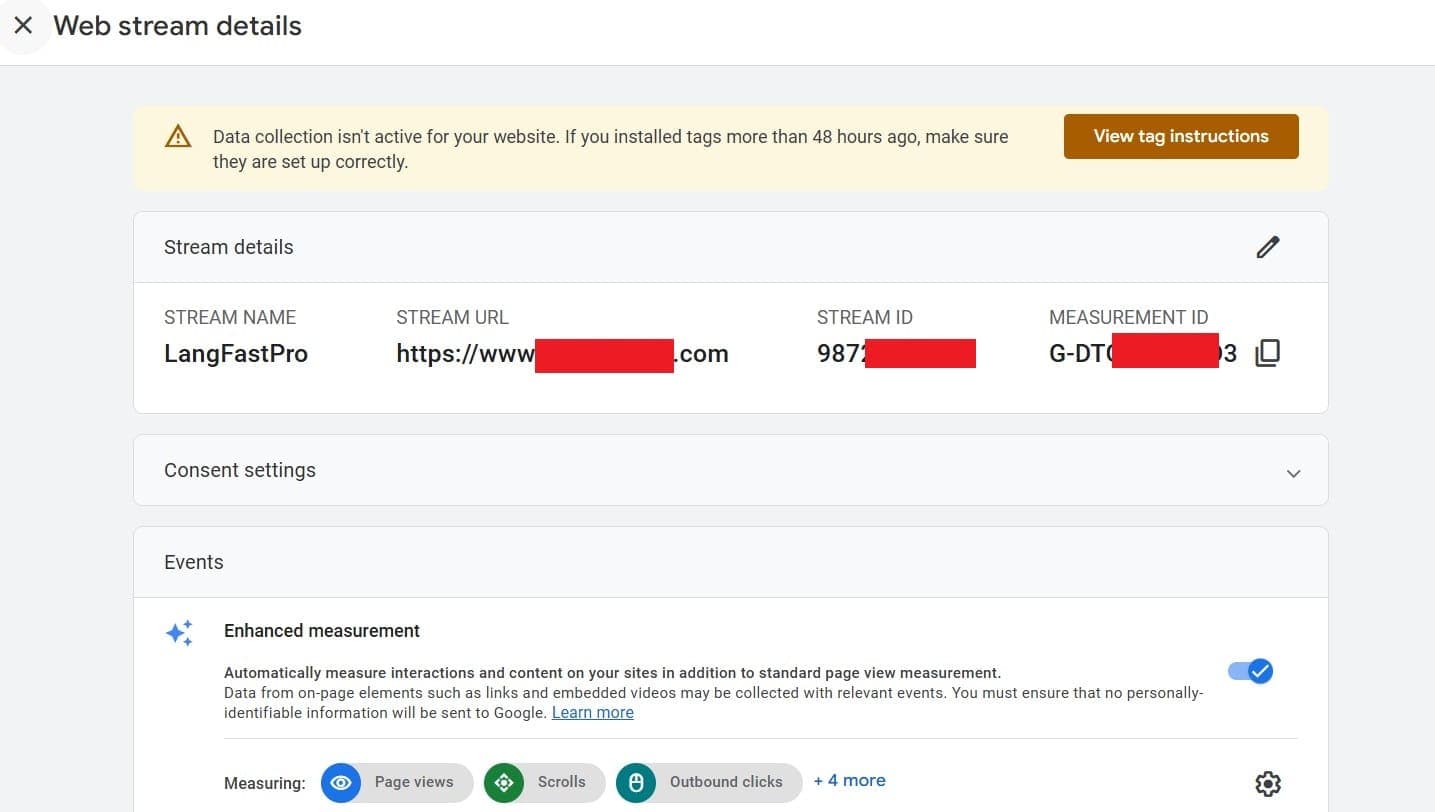
- Next, go to your web stream details where you’ll find your Stream ID and Measurement ID. If you can see these details, you’re ready for the next step.
-
Add Google Analytics to GTM
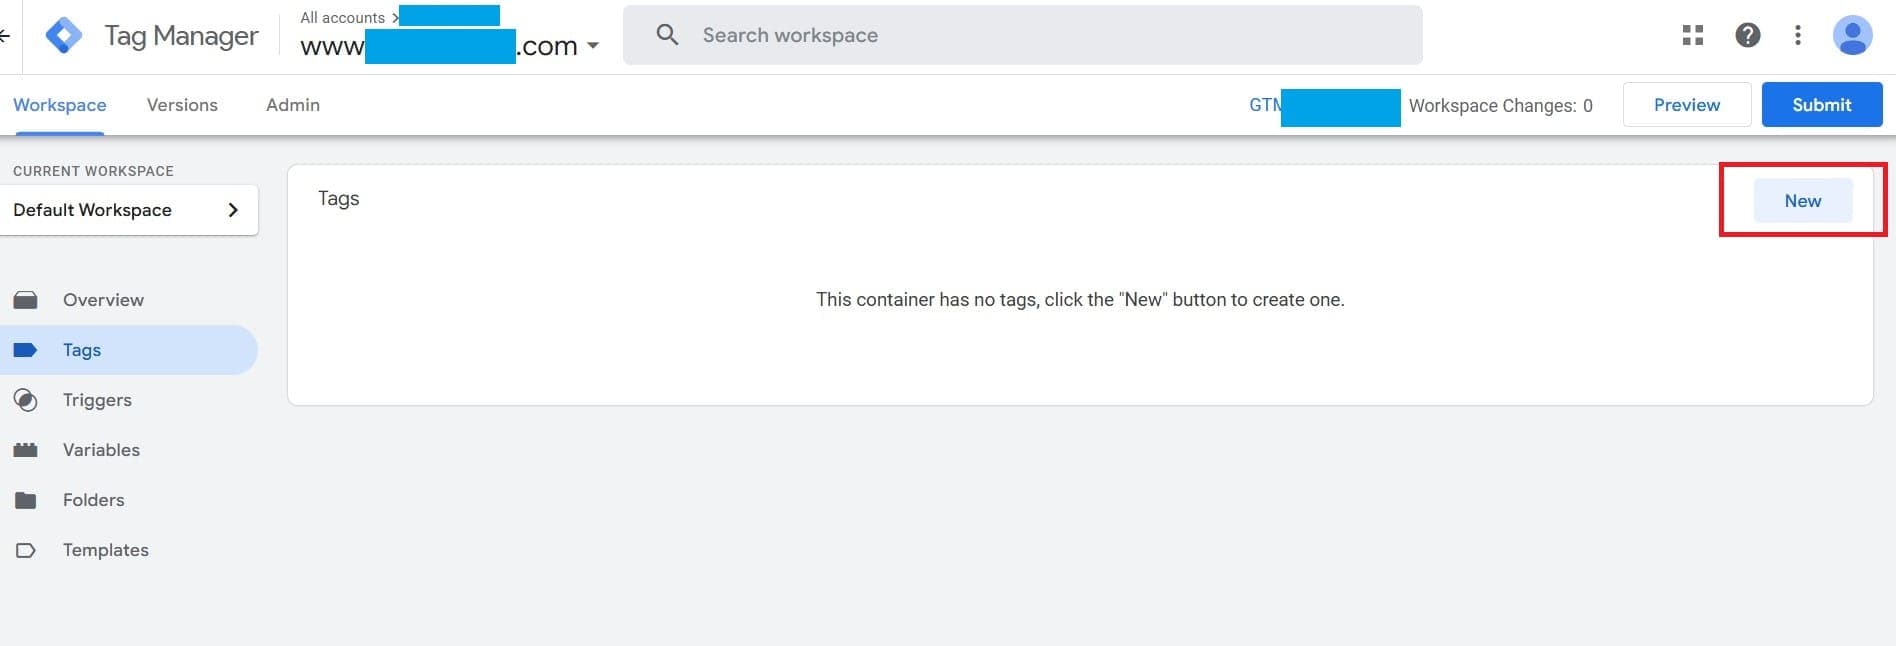
- Go back to your GTM dashboard. Click on Tags, then click New to create a new tag.
- Name your tag (e.g., "Google Tag").
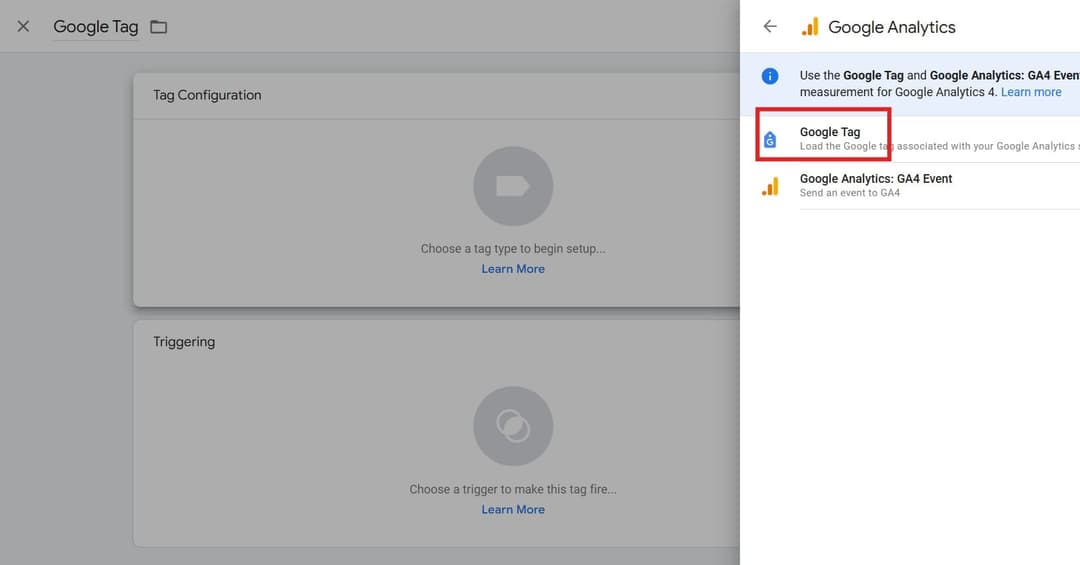
- Choose Tag Configuration and select Google Analytics > Google Tag.
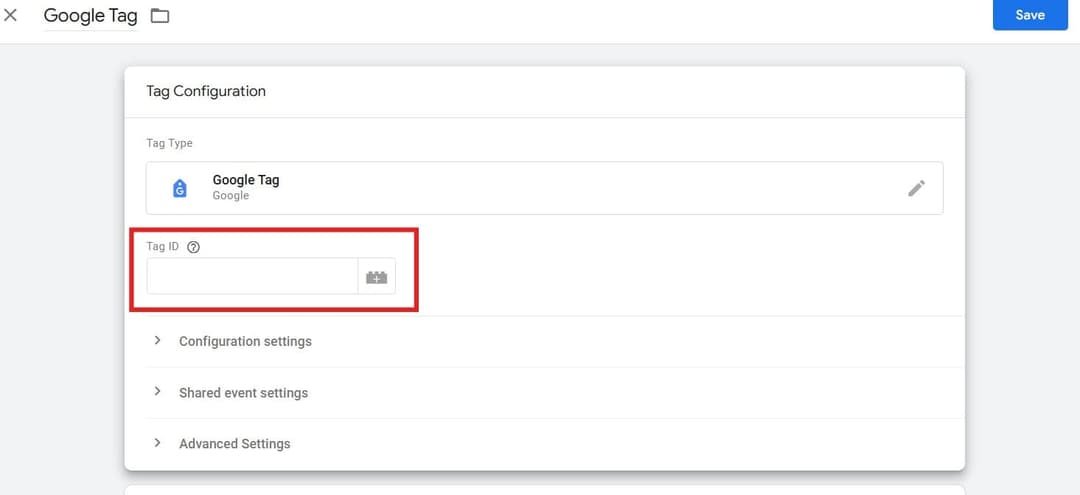
- In the Tag ID field, enter your Measurement ID (the ID you obtained from your web stream details).
- Go to Triggering and set the trigger to Initialization - All Pages to track data across your entire site.

- Save the tag.
-
Publish Your Changes
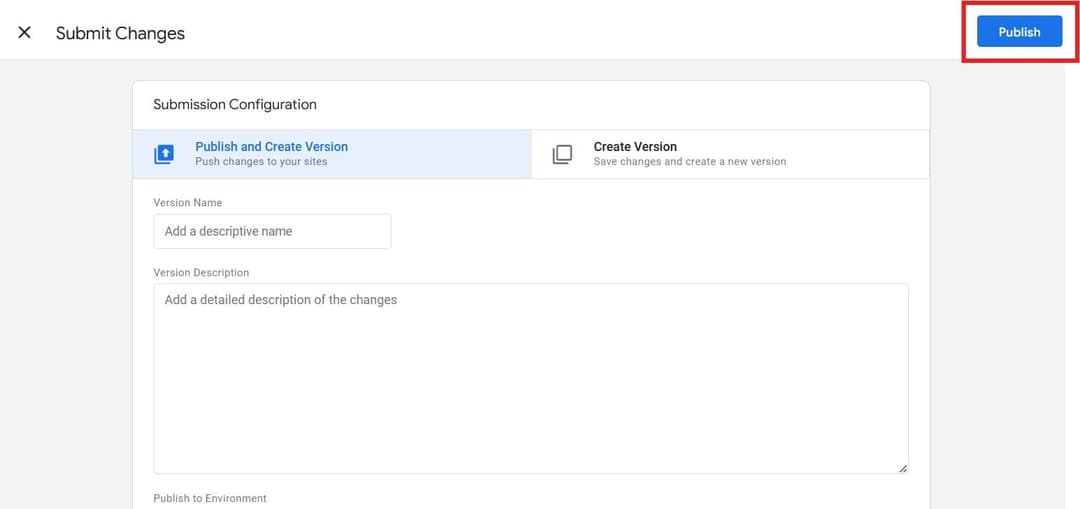
- Click Submit in GTM, then click Publish to apply the changes to your website.
-
Preview the Google Analytics Setup in GTM
- Ensure your website is running locally by typing
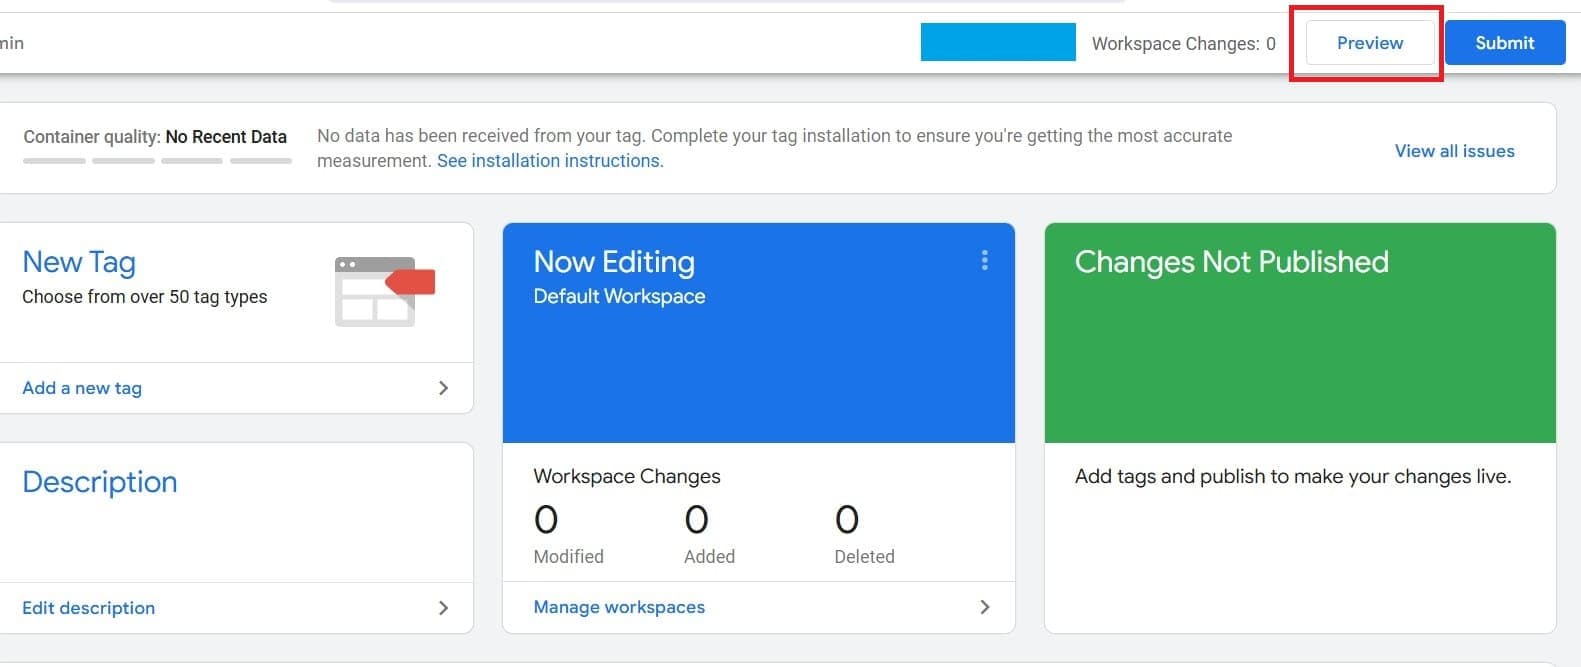
npm run devin your terminal. The site should be accessible athttp://localhost:3000. If port 3000 is unavailable, it might use another port like 3001, 3002, etc. - Next, go to the GTM dashboard and click on the "Preview" button.
- Enter your local website URL (e.g.,
http://localhost:3000) and click "Connect."
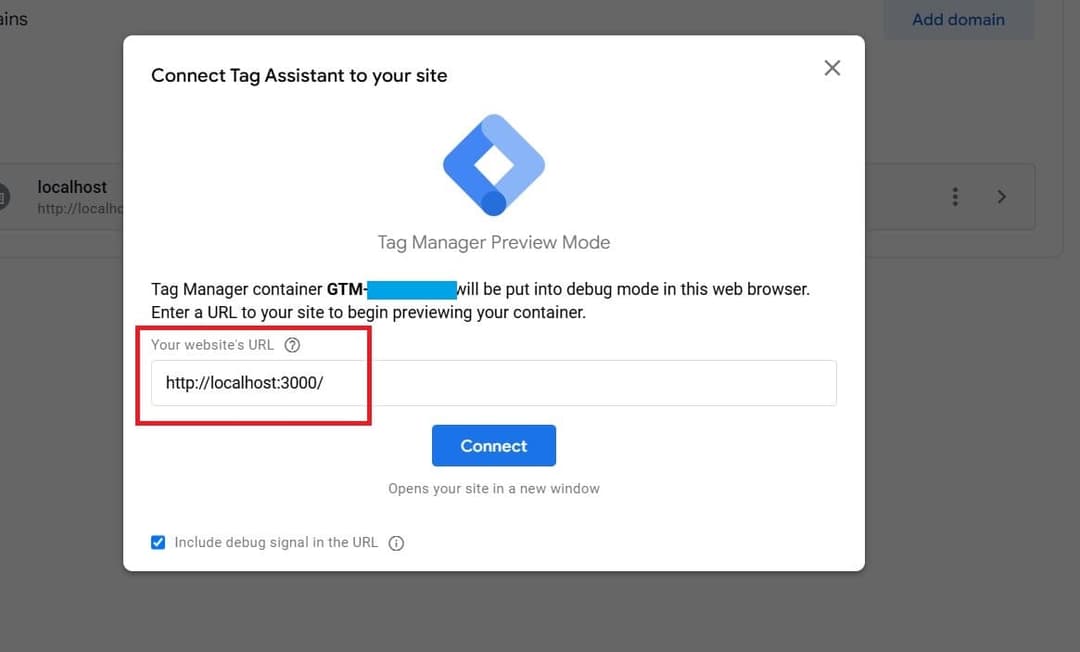
- If everything is set up correctly, you should see your Google Analytics tag firing when you visit your website.
- You can also verify the tag is firing by visiting your deployed website (e.g.,
www.yourdomain.com). Make sure your website is deployed; visit the Deployment section if you haven't done so yet.
- Ensure your website is running locally by typing
By following these steps, you'll have successfully integrated Google Analytics with your StartupBolt project. You can now monitor and analyze your website's performance using the GA dashboards.
Steps to Set Up Google Analytics GA4 Purchase and Checkout Events
To track specific actions like purchases and initiated checkouts on your website, you'll need to set up Google Analytics (GA4) events through GTM. Follow these steps:
-
Create Variables for Purchase and Checkout Event
- Go to your GTM dashboard, click on Variables, then click New to create a new user-defined variable.
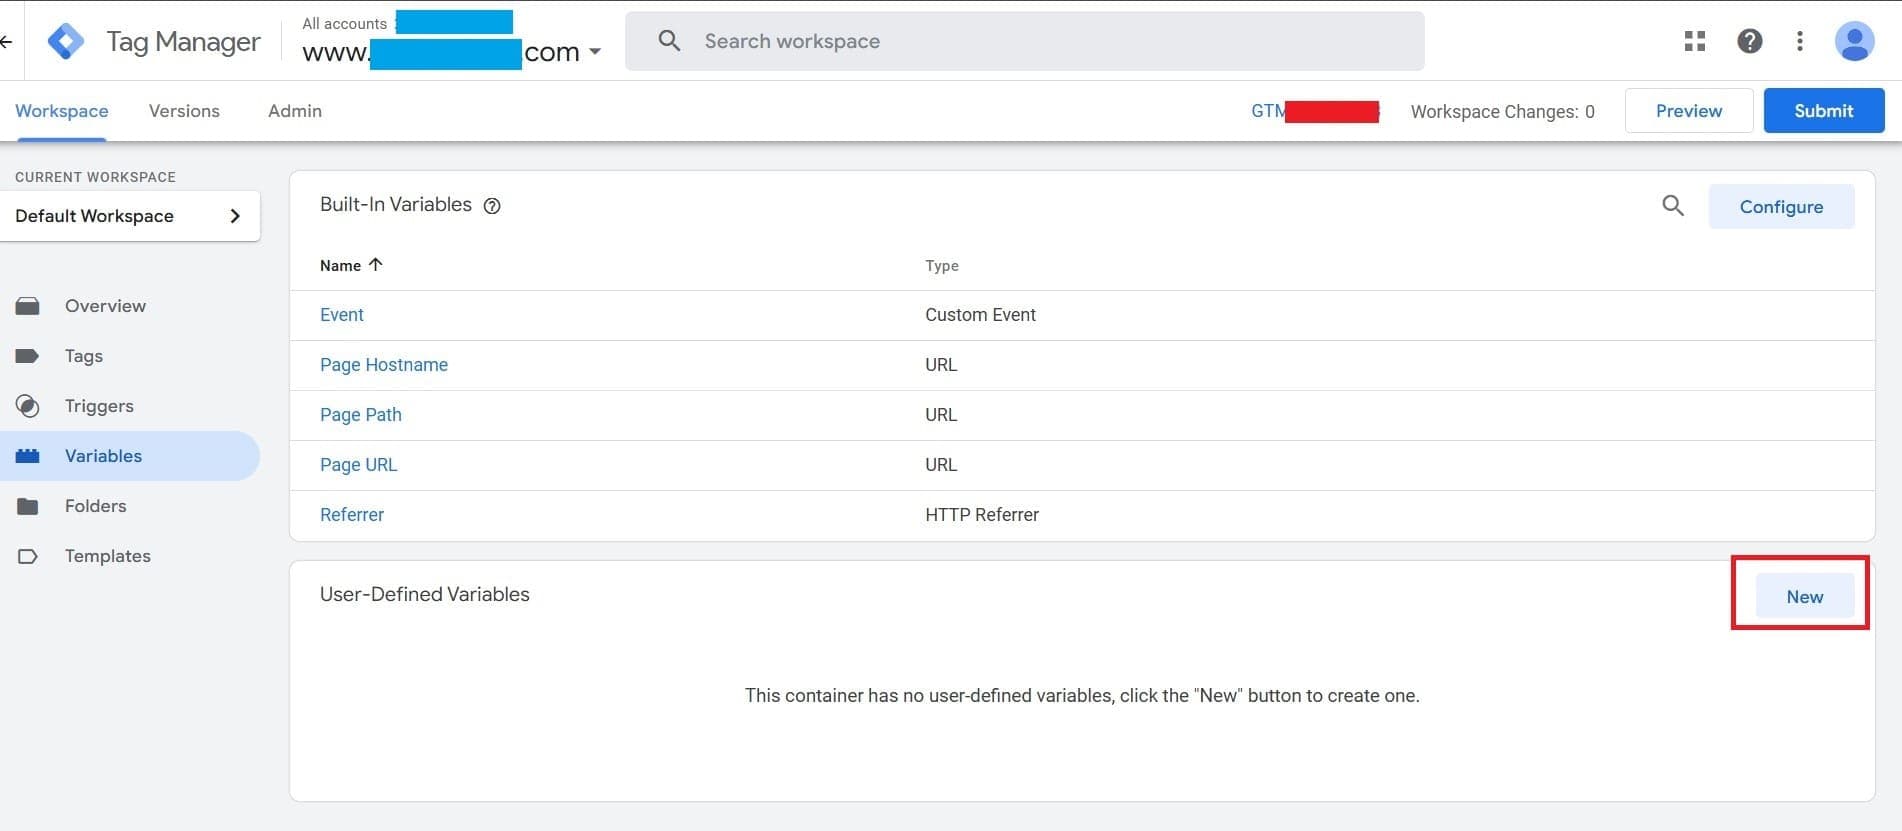
- Name the variable
ecommerce.currency. - Choose Variable Configuration and select Data Layer Variable.
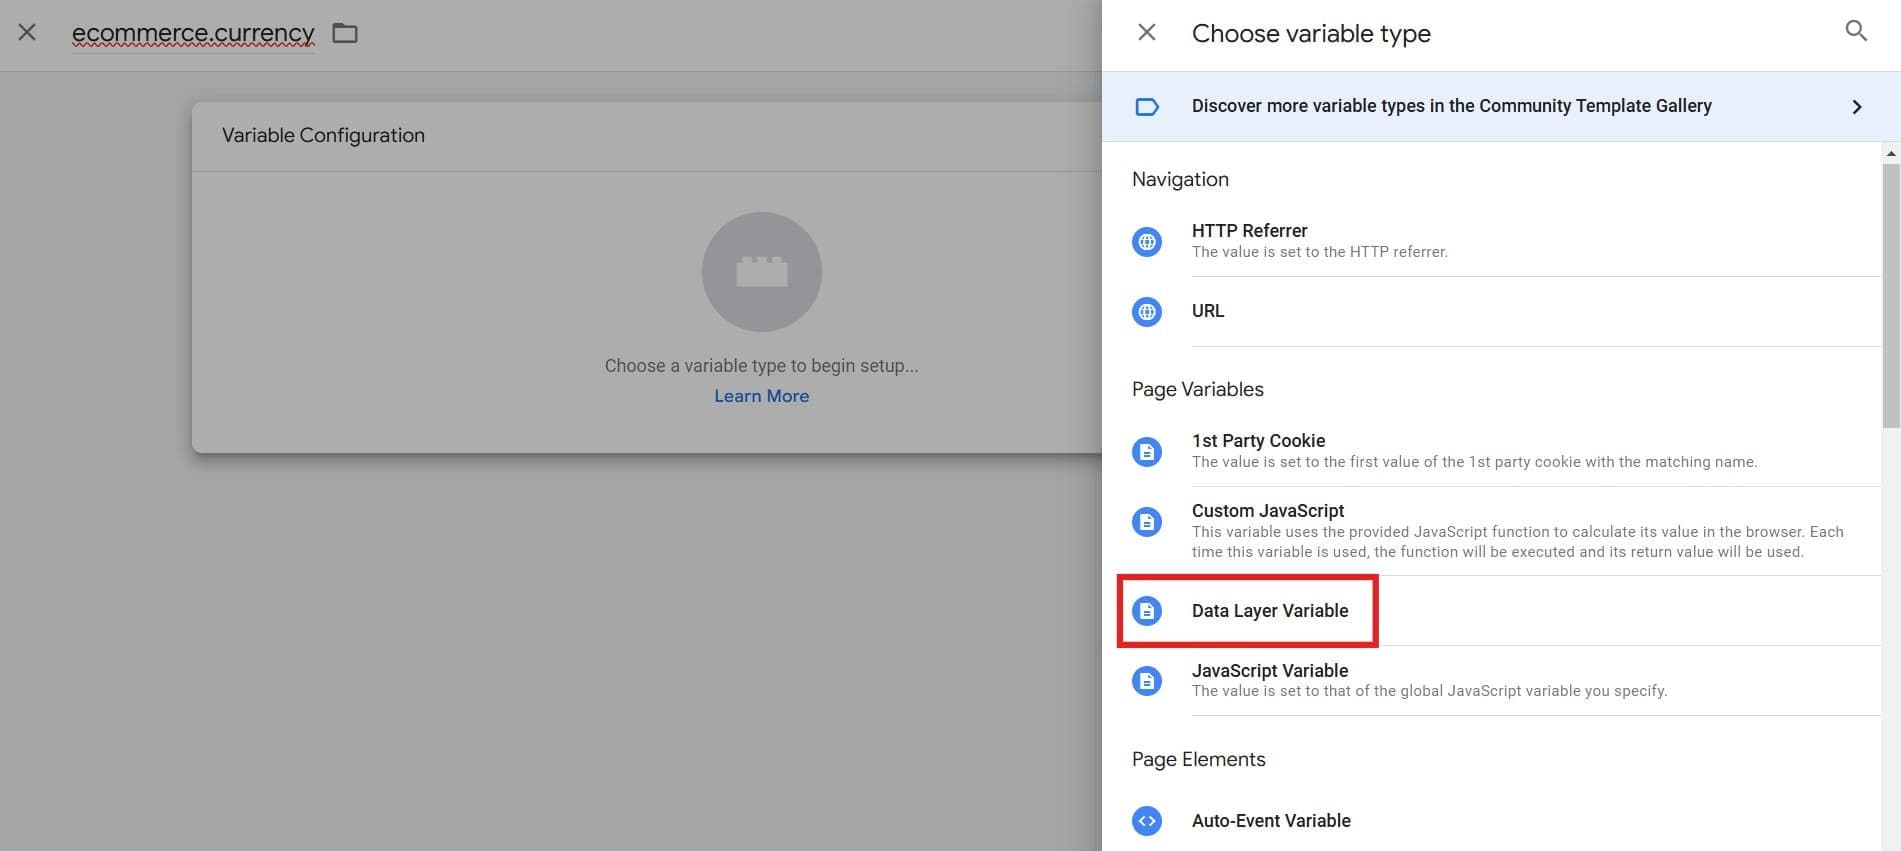
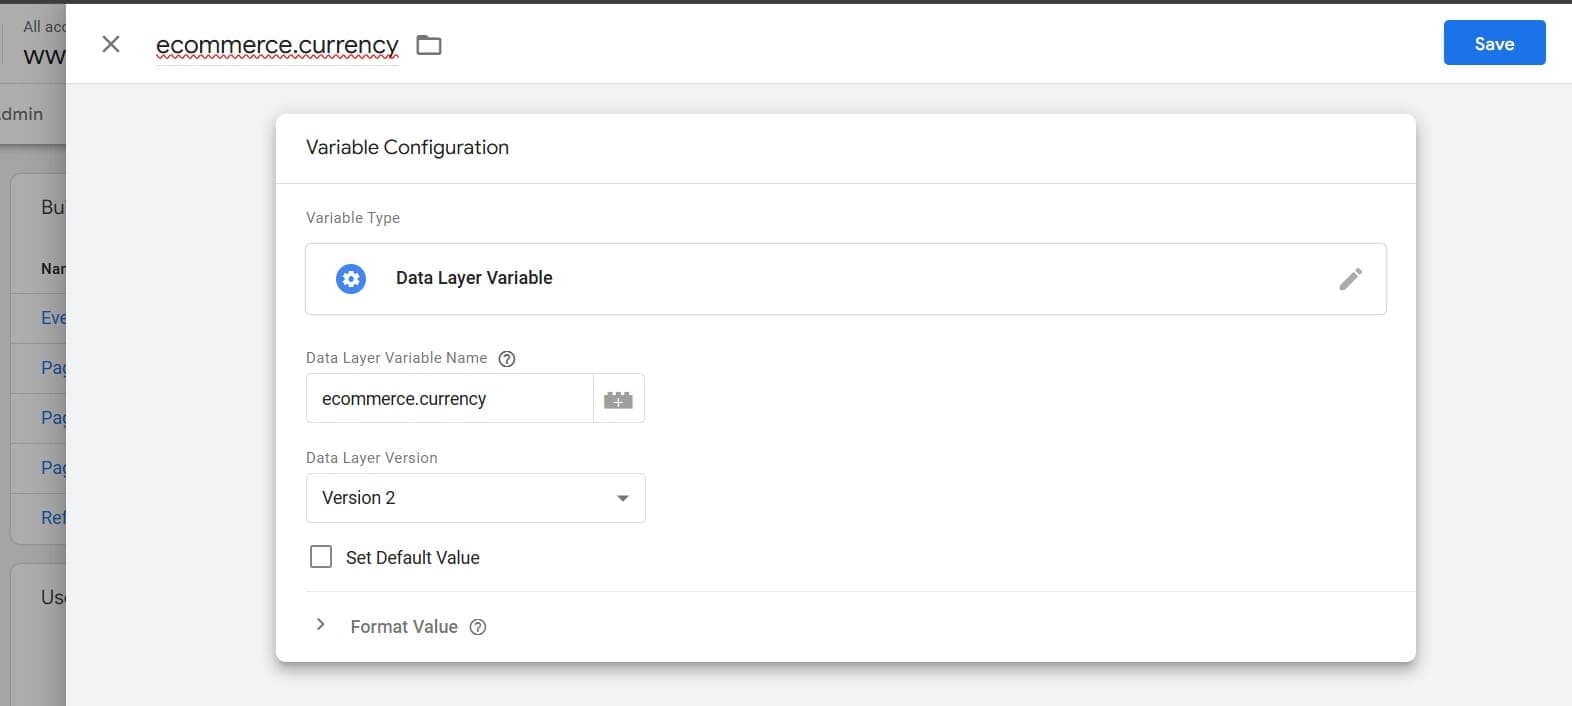
- In the "Data Layer Variable Name" field, enter
ecommerce.currency. Ensure that the Data Layer Version is set to Version 2, then click Save.
- Repeat the above steps to create two additional variables:
ecommerce.transaction_idecommerce.value

- Now, you have three variables:
ecommerce.currency,ecommerce.transaction_id, andecommerce.value. These variables will be used to send data from StartupBolt to Google Analytics. StartupBolt will use:ecommerce.valueto send the product price,ecommerce.transaction_idto send the transaction ID of the sale,- and
ecommerce.currencyto send the currency of the transaction.
-
Create Triggers for Purchase and Checkout Events
- Go to your GTM dashboard, click on Triggers, then click New to create a new trigger.
- Name the trigger "GA Purchase Trigger".
- Choose Trigger Configuration and select Custom Event.
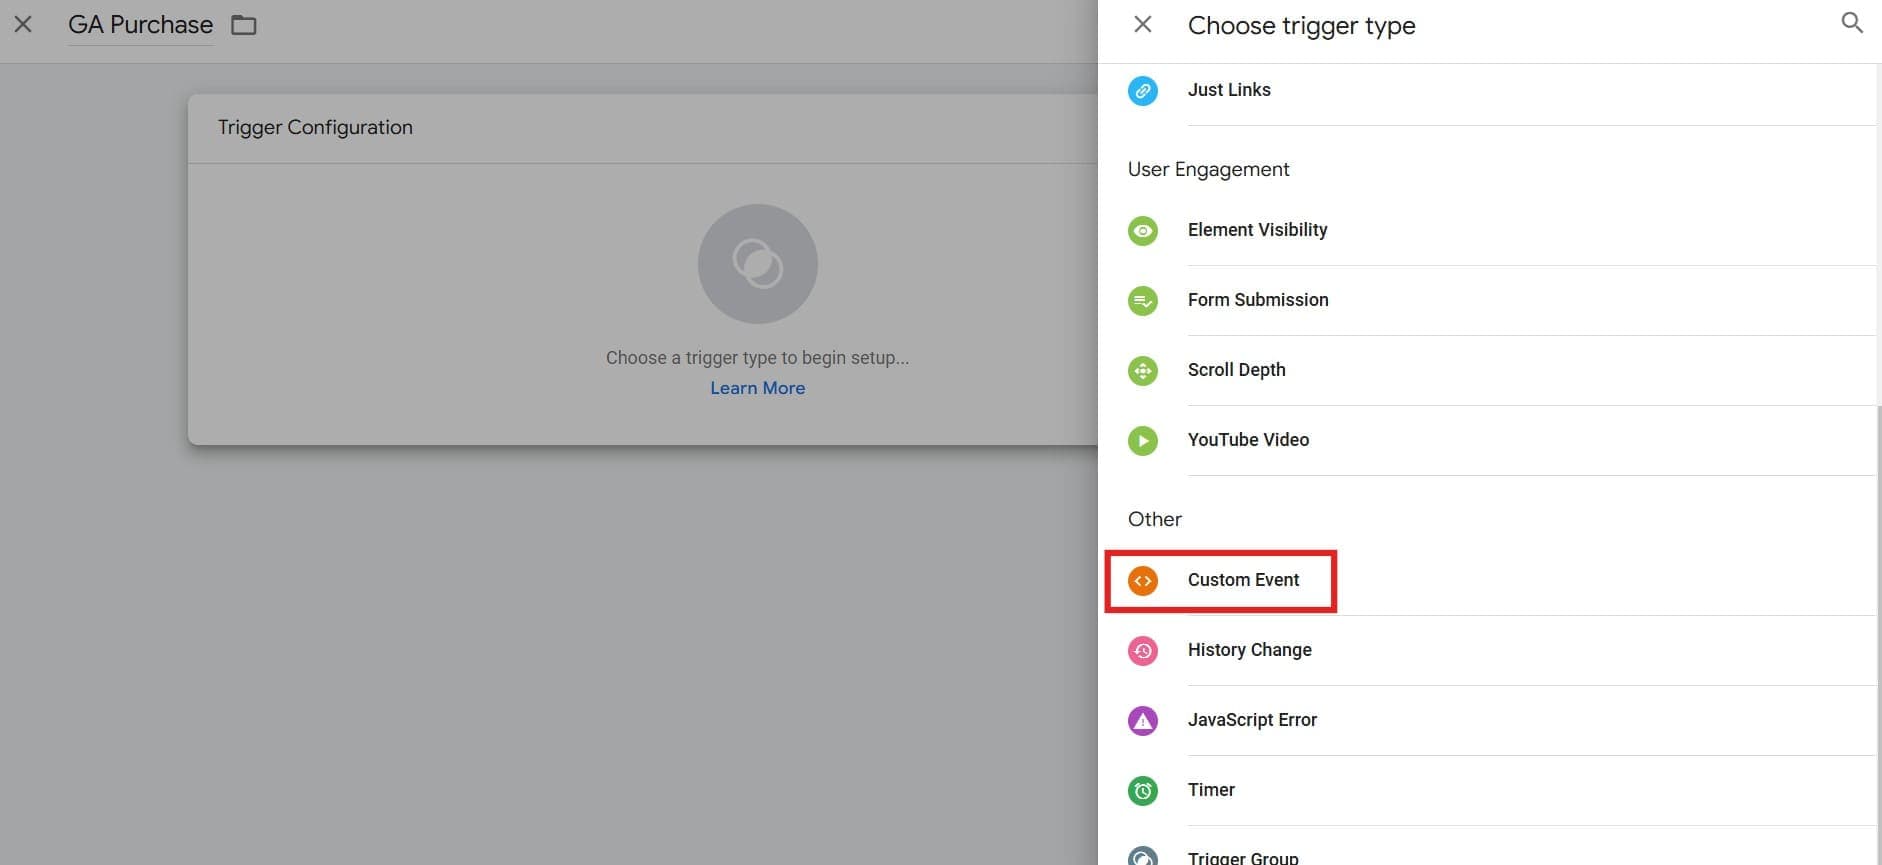
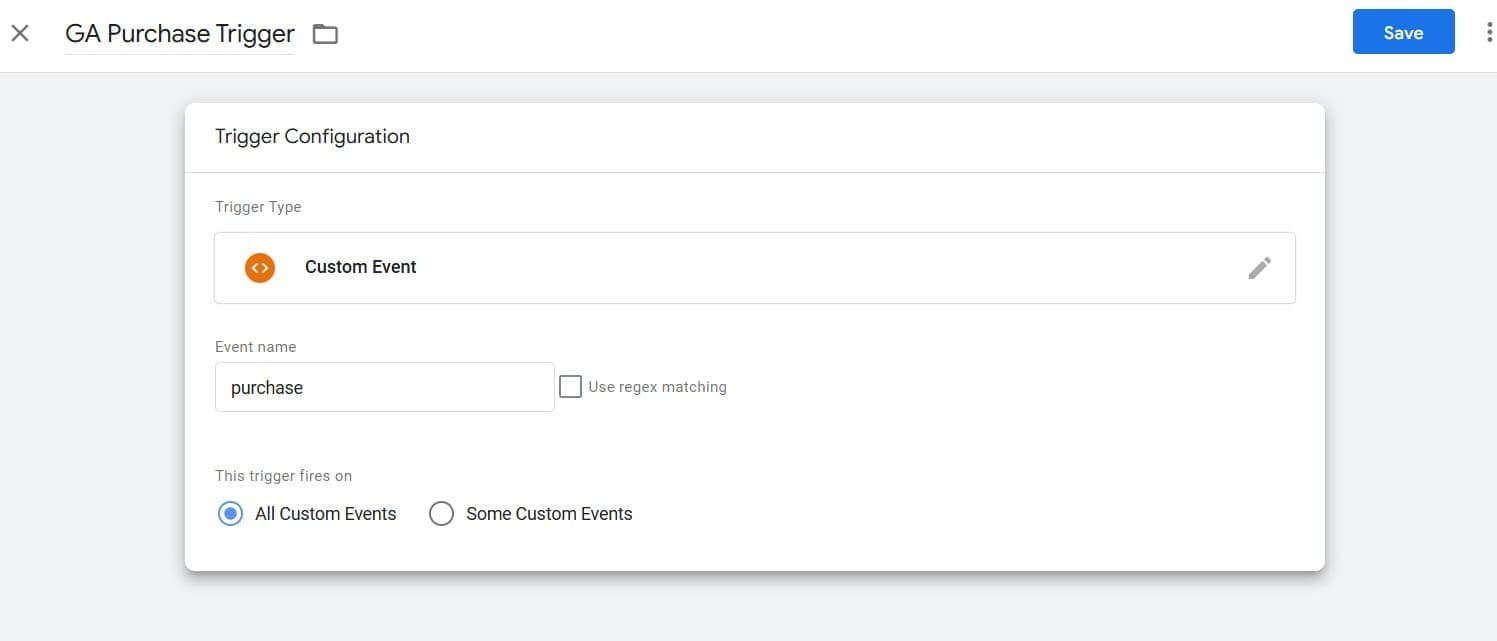
- In the "Event Name" field, enter
purchase. Make sure "This trigger fires on" is set to "All Custom Events," then click Save.
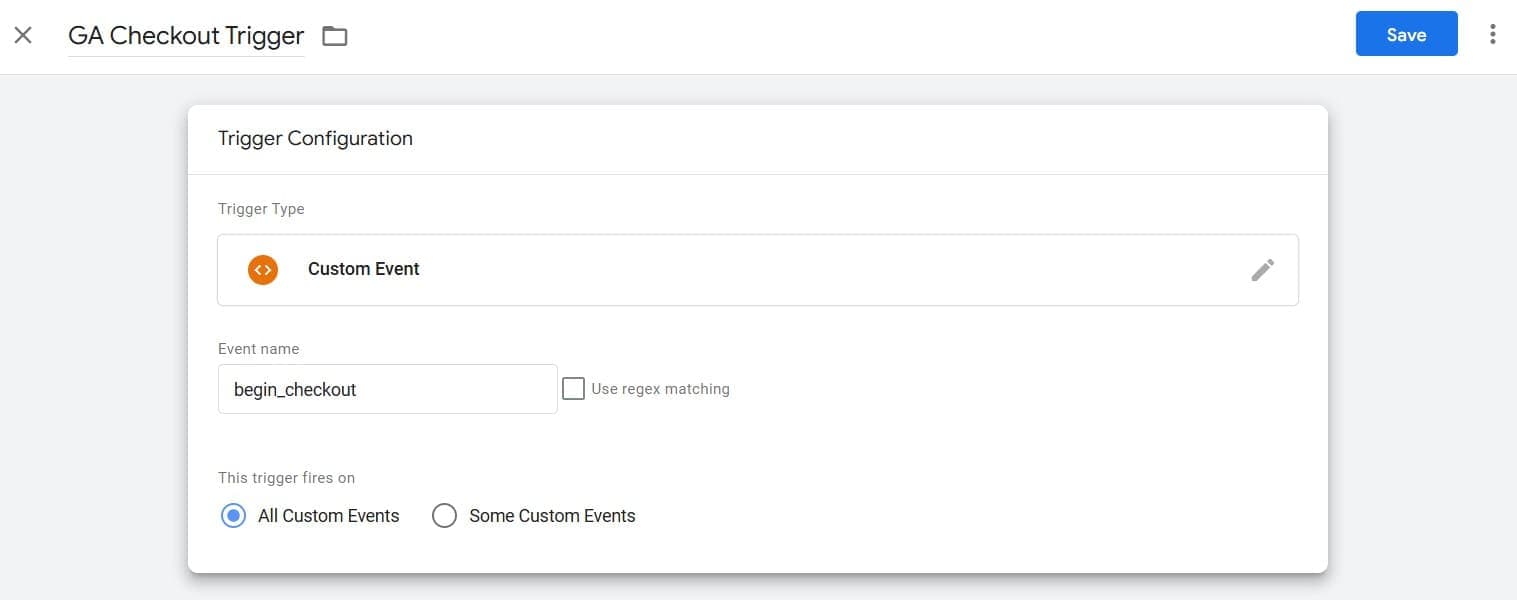
- Repeat the above steps to create another trigger. Name this trigger "GA Checkout Trigger".
- In the "Event Name" field, enter
begin_checkout. Ensure the remaining settings are the same, then click Save.
-
Create the Purchase Tag
- Go to your GTM dashboard, click on Tags, then click New to create a new tag.
- Name the tag "GA Purchase Tag".
- Choose Tag Configuration and select Google Analytics > Google Analytics: GA4 Event.
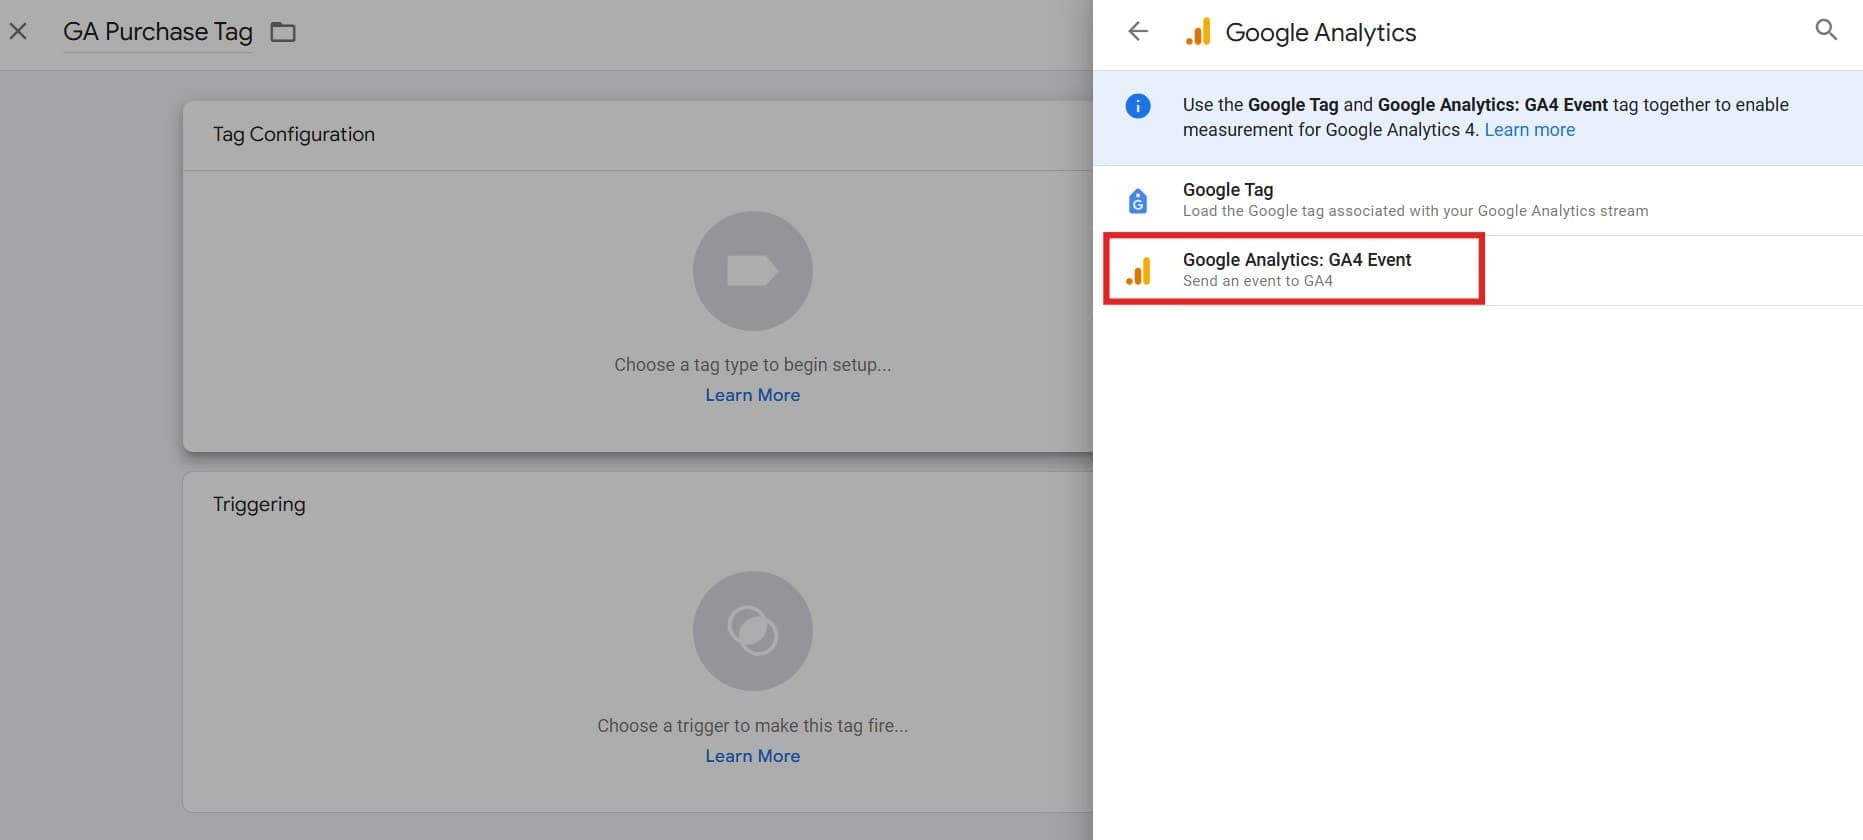
- Remember the Google Analytics Measurement ID from an earlier step?

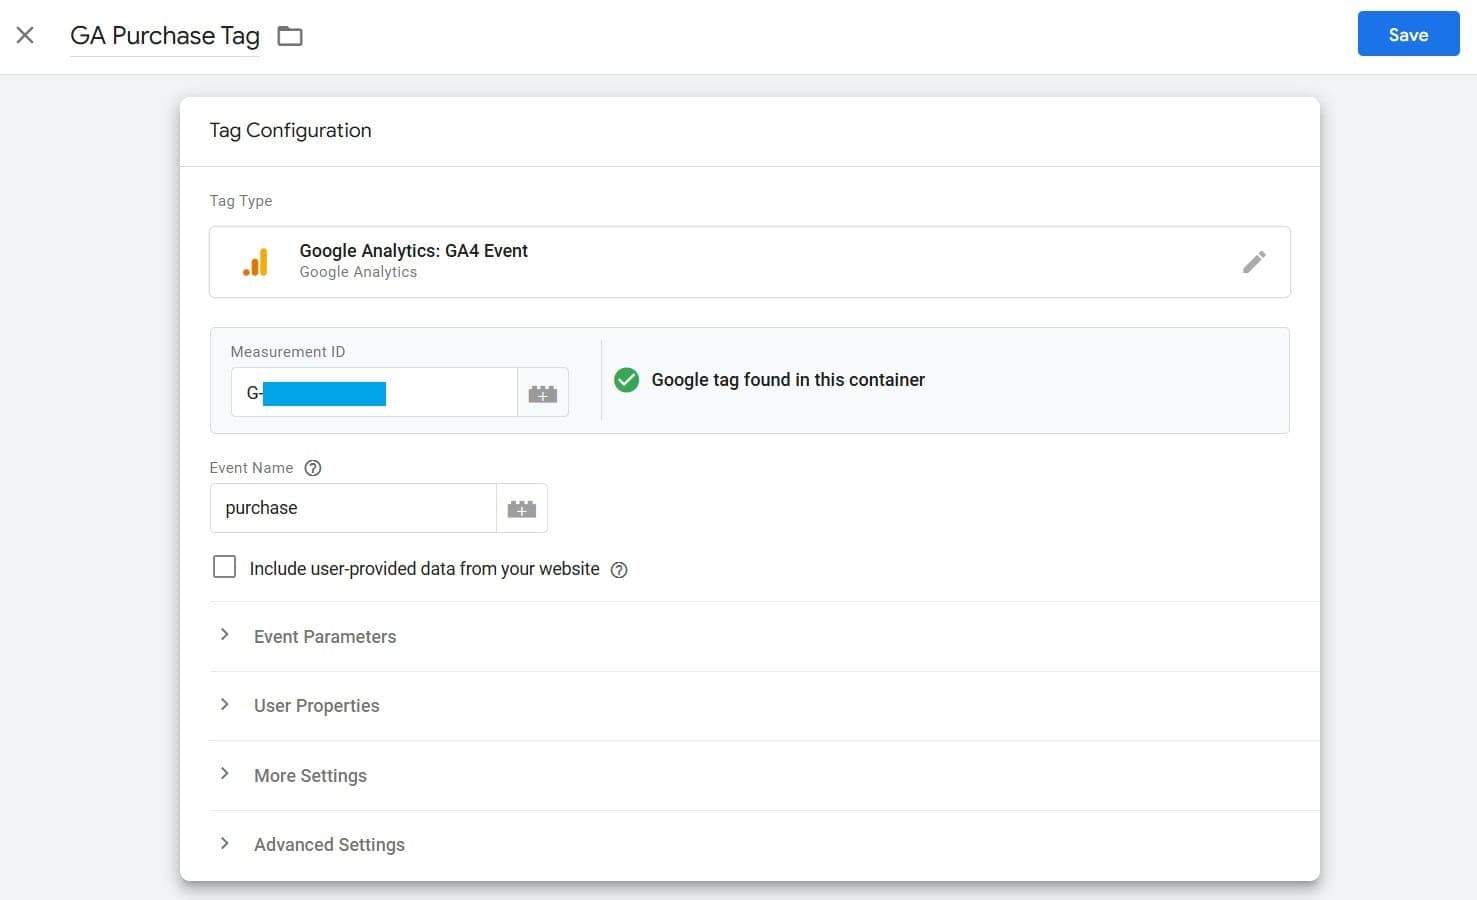
- Paste the Measurement ID in the Measurement ID field.
- Set the Event Name as
purchase.
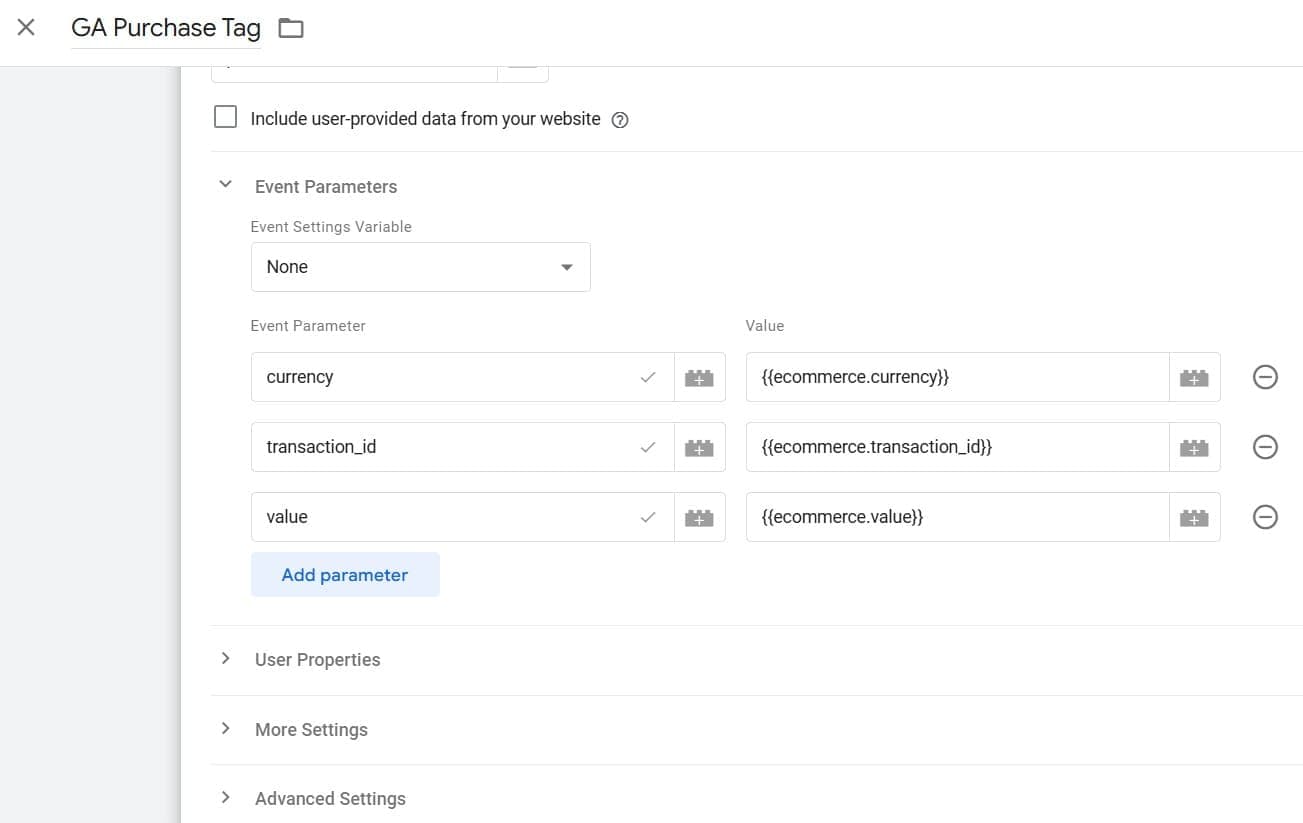
- Open Event Parameters and click "Add Row" to set the following parameters:
- Event Parameter:
currency| Value:{{ecommerce.currency}} - Event Parameter:
value| Value:{{ecommerce.value}} - Event Parameter:
transaction_id| Value:{{ecommerce.transaction_id}}
- Event Parameter:
- Go to Triggering and set the trigger to GA Purchase Trigger to fire this tag when a purchase occurs.
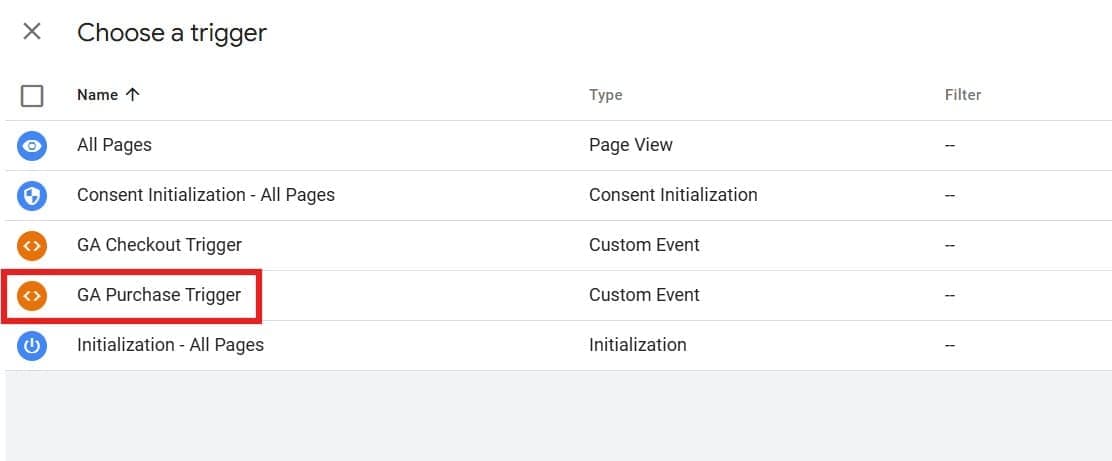
- Save the tag.
-
Create the Checkout Tag
- Now, create a checkout tag similar to the purchase tag created earlier.
- Go to your GTM dashboard, click on Tags, then click New to create a new tag.
- Name the tag "GA Checkout Tag."
- Choose Tag Configuration and select Google Analytics > Google Analytics: GA4 Event.
- Remember the Google Analytics Measurement ID from an earlier step?
- Paste the Measurement ID in the Measurement ID field.
- Set the Event Name as
begin_checkout.
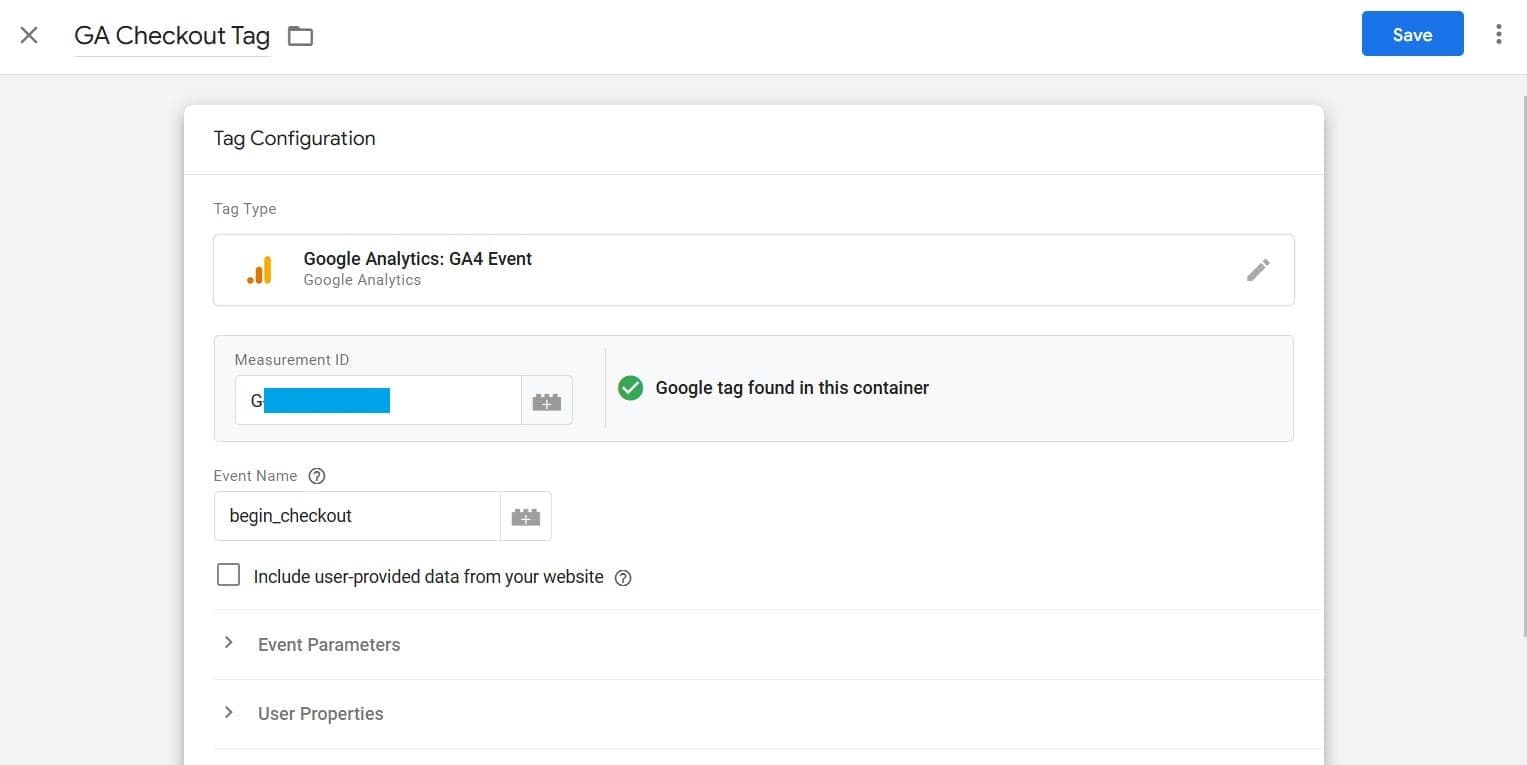
- Open Event Parameters and click "Add Row" to set the following parameters:
- Event Parameter:
currency| Value:{{ecommerce.currency}} - Event Parameter:
value| Value:{{ecommerce.value}}
- Event Parameter:

- Go to Triggering and set the trigger to GA Checkout Trigger to fire this tag when a checkout is initiated.
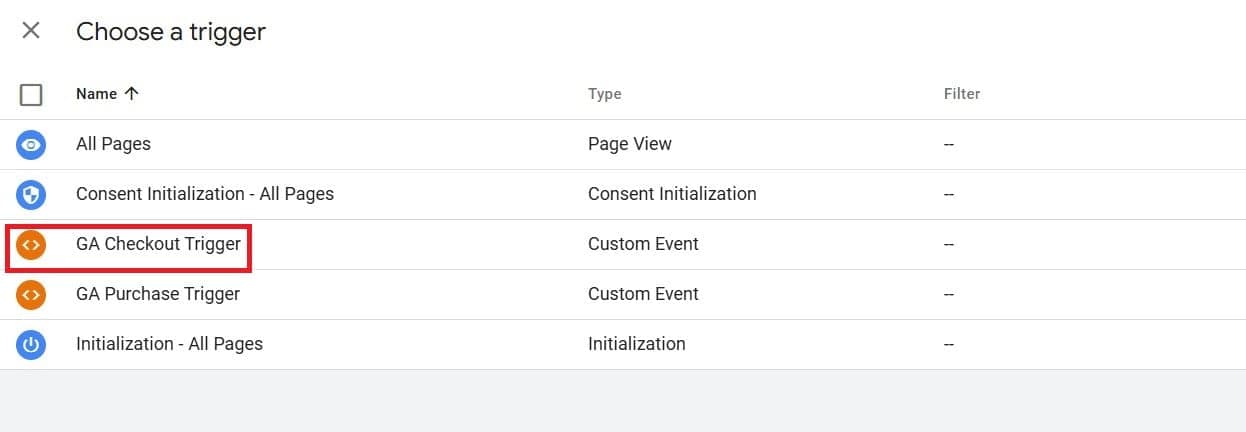
- Save the tag.
-
Publish Your Changes
- Click Submit in GTM, then click Publish to apply the changes to your website.

-
Enable Google Analytics
- Open the
/settings.jsfile located in the root directory of your project. This is the central configuration file for your StartupBolt application, containing various settings that control different aspects of your web app. - Set the value of
enableGoogleAnalyticsunder theMARKETINGobject totrue. It is set tofalseby default.
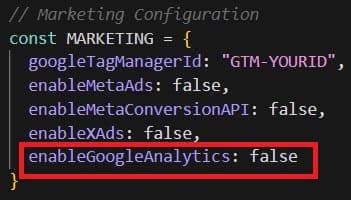
- Open the
-
Preview the GA Events Setup in GTM
- Ensure your website is running locally by typing
npm run devin your terminal. The site should be accessible athttp://localhost:3000. If port 3000 is unavailable, it might use another port like 3001, 3002, etc. - Next, go to the GTM dashboard and click on the "Preview" button.

- Enter your local website URL (e.g.,
http://localhost:3000) and click "Connect."

- If everything is set up correctly, you will see the GA Purchase Tag and GA Checkout Tag listed, but they will not fire yet since you haven’t initiated a checkout or made a purchase. This still indicates that the setup is working as expected.

- To test if the tags fire, click on the buy button if you have one on your website. For more details, check the Stripe Integration section or the LemonSqueezy Integration section. In test mode, click the buy button; you should see the GA Checkout Tag fire, and if you complete a purchase, you should see the GA Purchase Tag fire.
- You can also verify if the tags are firing by visiting your deployed website (e.g.,
www.yourdomain.com). Make sure your website is deployed; visit the Deployment section if you haven't deployed your site yet.
- Ensure your website is running locally by typing
By following these steps, you'll have successfully set up GA4 events for tracking purchases and checkout actions in your StartupBolt project. You can now monitor and analyze these specific events through the GA dashboards, gaining valuable insights into user behavior and sales.
Next up, we’re setting up Microsoft Clarity. It’s hands down one of the best free analytics tools out there—it gives you recordings of how users interact with your site and even shows heatmaps. When people land on your site through SEO or paid ads, it’s super important to see what they’re doing so you can fine-tune your landing page. No clarity without Microsoft Clarity, right? Let’s dive into setting it up in the next step. Let’s get started!